This pouch is the perfect weekend accessory for organizing your essentials. This versatile project combines the cozy texture of yarn with the practicality of a secure closure. Whether you need a makeup bag, a pencil case, or a small travel organizer, learning to make one will elevate your crafting skills.
Why a Crochet Zipper Pouch Belongs in Your Weekend Routine
Weekends are for relaxation and small projects that bring joy. It fits seamlessly into this rhythm because it is quick to complete and highly functional. You can finish one in a single afternoon, making it ideal for a Saturday craft session.
This accessory also makes a thoughtful handmade gift for friends who appreciate practical items. It can be customized with your favorite colors and stitch patterns. It is a small project that yields big satisfaction.
Materials You Need for Your Crochet Zipper Pouch
Gather a few basic supplies before you begin your crochet zipper pouch. You will need worsted weight yarn in your chosen color, a matching zipper, and a crochet hook in the size recommended on your yarn label. A tapestry needle and sewing thread are also essential for attaching the zipper.
Consider using cotton yarn for a sturdy pouch that holds its shape. Acrylic blends work well too and offer more color options. The crochet zipper pouch requires only a small amount of yarn, so it is a great stash-busting project.
Step-by-Step Guide to Crocheting Your Pouch
Start by crocheting a rectangle that will form the body of your pouch. Use single crochet stitches for a dense fabric that supports the zipper well. Measure your rectangle to ensure it is slightly wider than your zipper length.
Once the rectangle is complete, fold it in half with the right sides facing out. Sew the side seams using a whip stitch, leaving the top open. Now you are ready to attach the zipper, which is the most critical step for a professional-looking crochet zipper pouch.
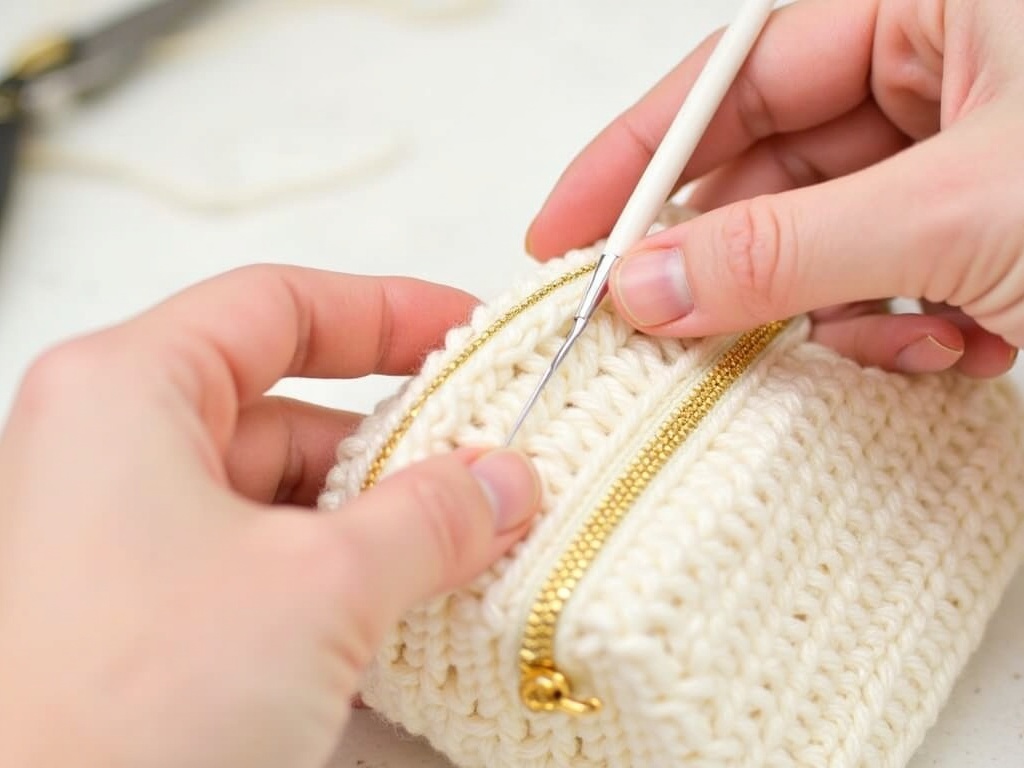
Attaching the Zipper Like a Pro
Pin the zipper along the top edge of your pouch, centering it carefully. Use a sewing needle and thread to hand-stitch the zipper in place, working through both the fabric tape and the crochet stitches. Take your time to ensure the zipper lies flat and opens smoothly.
For extra security, you can also crochet a small tab at one end of the zipper to make it easier to grip. This detail adds a polished touch to your crochet zipper pouch. Practice on a scrap piece first if you are new to sewing zippers into crochet.
Creative Variations for Your Pouch
Experiment with different stitch patterns to give your crochet zipper pouch unique texture. Try using half double crochet or a shell stitch for a lacy look. You can also add a fabric lining inside the pouch to protect delicate items.
Another idea is to use two contrasting colors for a striped effect. The crochet zipper pouch can be scaled up or down by adjusting the starting chain length. Make a set of pouches in various sizes for all your weekend needs.
Final Thoughts
Now that you have mastered the basics, grab your yarn and zipper to create your own crochet zipper pouch. This project is a wonderful way to spend a relaxing weekend afternoon. For more inspiration, check out our guide on weekend craft projects. You can also learn more about zipper types and techniques from this sewing resource. Start stitching today and enjoy the satisfaction of a handmade accessory that keeps your life organized.
Explore a guide on our sister blog
Related reading: Explore more on this topic